Abstract
One of the major difficulties in meshing 3D complex geometries is to deal with non proper geometrical definitions coming from CAD systems. Typically, CAD systems do not take care of the proper definition of the geometries for the analysis purposes. In addition, the use of standard CAD files (IGES, VDA,...) for the transfer of geometries between different systems introduce some additional difficulties. In this work, a collection of algorithms to repair and/or to improve the geometry definitions are provided. The aim of these algorithms is to make as easy as possible the generation of a mesh over complex geometries given some minimum requirements of quality and correctness. The geometrical model will be considered as composed of a set of NURBS lines and trimmed surfaces. Some examples of application of the algorithms and of the meshes generated from the corrected geometry are also presented in this work.
keywords Mesh generation, geometry correction, NURBS.
1 INTRODUCTION
Mesh generation using structured and unstructured grids is still nowadays one of the bottlenecks in the practical application of the finite element method (FEM). See [1] and [2].
Geometrical models created for finite element mesh generation purposes are typically created by the mesh generation software or imported from an external CAD system. In both cases, the geometrical model must satisfy a series of quality constraints.
Normally, geometrical models are constructed as a set of NURBS lines and trimmed surfaces. These entities can be mathematically correct and suitable for other uses like visualization or CAM but, in many cases, they are not good enough for meshing operations. In these cases, it is necessary to adapt/repair the geometrical entities by changing their mathematical description while maintaining the same geometrical shape. The final entities should be better suited for the mesh generation operations. See [3] and [4].
The algorithms proposed in this paper are considered as a set of filters that will be applied to a geometry definition just after being imported or created. The algorithms are:
- collapse of entities
- correction of the list of knots
- reparametrization
- conversion to similar cubic entity
- union of curves
- reorientation of the boundary of the surfaces
- collapse of small angles
With the help of these algorithms, it is possible to automate the process of importing geometry from CAD and mesh on it while maintaining an acceptable level of quality criteria. This process should be performed without the need of manual intervention.
To understand better what follows, a short description of the NURBS lines and surfaces entities is given. A deeper description can be found in [6] and [5].
1.1 NURBS lines
A NURBS line is a geometrical entity, described as a parametric line in the 3D space, that is defined with a set of knots, a set of control points, and a set of weights if it is rational.
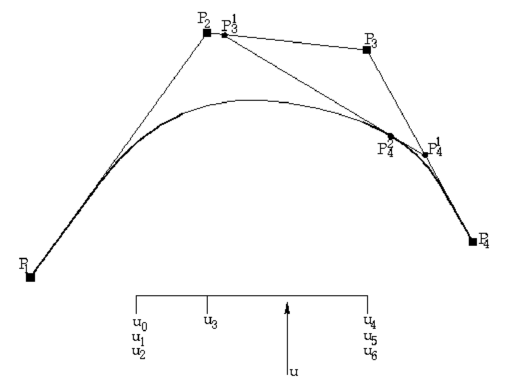
|
| Figure 1: Example of a quadratic NURBS line with 4 control points evaluated for a given value of . |
The knots are a list of non-decreasing numbers that begin in the lower range of the parameter space (usually 0.0) and finish in the high range of it (usually 1.0). A knot has multiplicity if its value is repeated times inside the list of knots. The initial and the end knots must have multiplicity , where is the degree of the curve.
The control points are a list of points in the 3D space that are part of the NURBS definition. The line will interpolate the first and the last point and will smoothly approximate the other points.
The weights are a set of non-negative real numbers, one for every control point. They allow the shape of the curve to change and also to have an exact representation of conic curves like circles or ellipses.
The number of knots, must be equal to , where is the number of control points.
The evaluation of a NURBS curve for a given value of the parameter can be done in a recursive manner. First, it is necessary to identify the interval in the list of knots that contains the value of (). Next, the following recursive expression can be applied:
|
1.2 NURBS surfaces
A NURBS surface is the extension of the NURBS line to one additional dimension in the parametric space. Most of the properties of the NURBS curves applies here. There is a list of knots for every parametric direction and . The control points are a set of points with and .
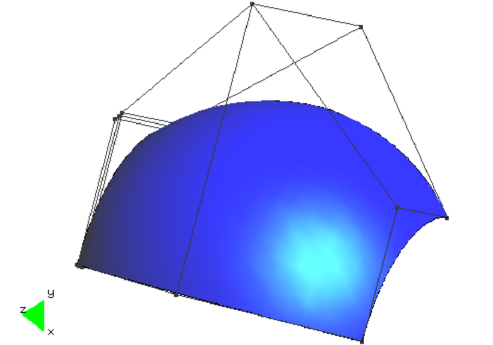
|
| Figure 2: NURBS surface with the corresponding control polygon. |
The evaluation of the surface can be made in different ways:
- To evaluate first the NURBS curve corresponding to one of the parametric directions (maintaining constant) and obtain a NURBS line. Then, to evaluate the resulting NURBS curve in the second direction .
- Recursive evaluation. Similar to the expression (1) given for the NURBS curve.
- Evaluation by means of the b-spline base. This technique is also usable for curves.
The evaluation with the b-spline base is done by defining a base of b-splines, , as a recursive function in the following recursive way:
|
(6) |
2 COLLAPSE OF ENTITIES
The standard CAD exchange formats (IGES, VDA,...) do not contain the topological connection between the different surface patches defining a closed geometry. These files just contain the mathematical description of the patches. Nevertheless, in order to proceed with a correct mesh generation it is necessary to check the correctness of the 3D geometry by ensuring, for example, that it is defined by a completely closed surface. In addition, many mesh generation algorithms need to know the neighboring relation between patches in order to advance in their work. For this reason, it is necessary to obtain the topological connection between the different surface patches.
An important additional difficulty is that, very often, the boundary curves defining neighboring patches are very similar, but not identical. Normally, the corresponding pairs of curves are close enough for the different visualization or CAM operations, but not for the necessary operations for the analysis. This makes the task of identifying neighbor patches very difficult.
In order to solve this difficulty it is necessary to define a geometrical tolerance. When two different geometrical entities are separated by a distance smaller than the prescribed tolerance they are considered to be identical and they are collapsed. This tolerance can be specified by the user or can be obtained in an automatic way as a certain percentage of the total size of the geometrical model.
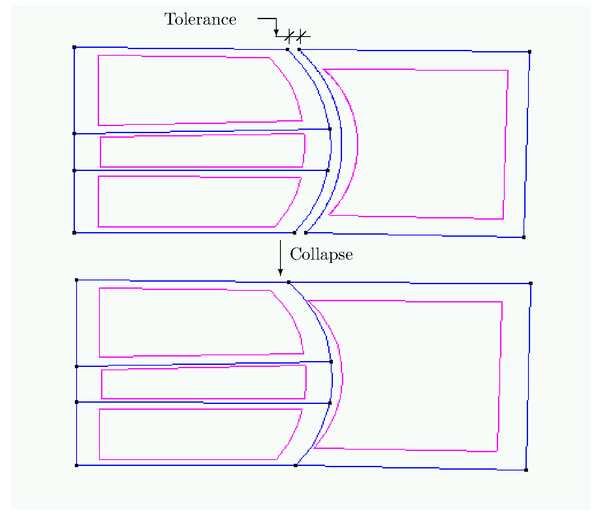
|
| Figure 3: The collapse procedure reduces the initial four curves to only three. |
Given a geometrical tolerance , the collapse criteria for the different geometrical entities are the following:
- Two points are collapsed into a single one if:
|
|
where is the vector of coordinates of point .
- Two curves are collapsed if they share their end points and the maximum distance between them is smaller than . In addition, they are also collapsed if a curve belongs to the interior of another one. This last property means that, in addition to the first criterion, its end points accomplish
|
|
where is the second curve. In the latter case, the final result of the collapse operation is not a single curve but a group of curves as shown in Figure 3.
- Two patch surfaces are collapsed if they share their boundary curves and a similar maximum distance criterion is accomplished.
- Two volumes are considered as equivalent if they share their boundary surfaces.
The computation of the maximum distance between different curves or surfaces is made in an approximated way as follows: a fixed number of points are chosen in the interior of the curve or surface depending on their geometrical characteristics. The distance point-curve or point-surface is computed for each of the selected points. Then, is approximated as .
In general, a big number of control points and a high degree of the line or surface formulations will imply a bigger geometrical complexity. For this reason, the number of selected points will be related to the two mentioned values.
In the computation of the values the point is obtained as the mapping of the original point over the geometrical entity and . The mapping operation is the transformation of an original point to the closest point contained into a geometrical entity like a curve or surface. This procedure is described in [5].
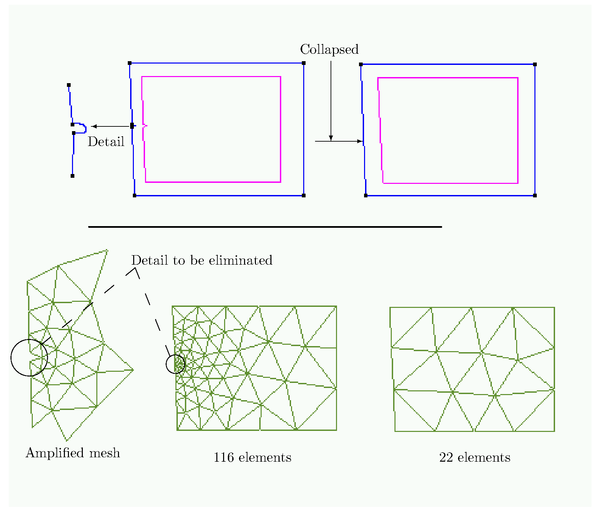
|
| Figure 4: Saving of elements when unnecessary details are eliminated. |
The collapse operation is also useful to eliminate small details of the geometry that can be of no relevance for the analysis. If some lines or surface patches are smaller than the tolerance, they can disappear and their neighbor entities are reconnected. This operation is normally called feature reduction. From the practical point of view, many details that are crucial for the design task, can be totally irrelevant for the analysis. This operation can save a lot of elements and degrees of freedom in the final finite element mesh. In Figure 4 a graphical example of this possibility is shown.
3 CORRECTION OF THE LIST OF KNOTS
The list of knots is a set of non decreasing real values that belong to the parametric space and are used for the definition of a NURBS. A more detailed definition of knot can be obtained in [6].
In the formulation of a NURBS curve or surface the list of knots cannot contain any knot with a multiplicity higher than the degree of the mathematical entity. Nevertheless, in many cases the standard exchange files contain this type of error. In these cases, it is necessary to correct the list of knots by eliminating the overdefined knot and the associated weights and points. In this way, if we have a degree NURBS curve defined by points with the following list of knots:
|
the list (7) will be reduced to:
|
|
and the list of control points (8) and weights (9) to:
|
Note that the new list will have control points and that the resulting curve will be an approximation to the original one, being the original one a mathematically incorrect representation of a curve.
4 REPARAMETRIZATION
A very desiderable property for the mesh generation algorithm is to use the arc length as the defining parameter over the curve or surface. This property is not normally available in the NURBS curves or surfaces. This can be partially corrected by using a constant distance between each pair of consecutive control points. Nevertheless, in order to obtain the best possible quality during the mesh generation process it is convenient to improve the parametrization from the very beginning. The corresponding changes that are produced in the curves or surfaces during the improvement of their parametric definition are named reparametrization.
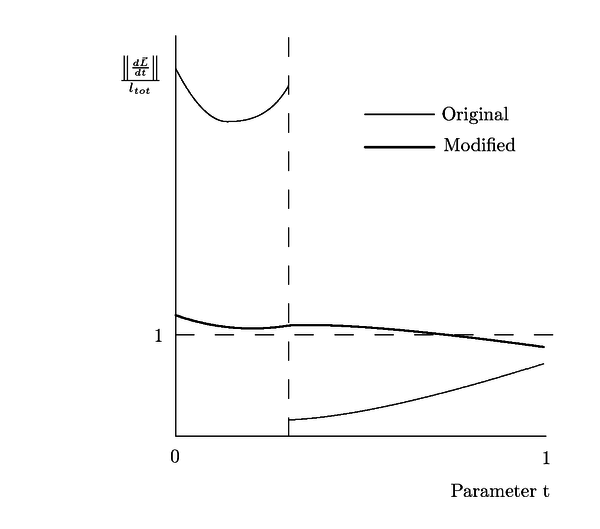
|
| Figure 5: Comparison between the derivatives of the curve before and after the reparametrization. |
A major problem arises when there are big discrepancies between the spacing of distances between the control points and the spacing between the orresponding associated points of the curves or surfaces. This problem can be detected by a comparison between the modulus of the derivatives in the following way:
|
|
(12) |
where the in (12) represents an interior knot and is a maximum acceptable parameter that, for acceptable parametrizations, can have values between 4 and 5. In this formula, represent the curve.
The first step of the correcting process consists of decomposing the curve into the addition of the set of the equivalent Bézier curves. This can be done by inserting multiple knots until a multiplicity equal to the order of the mathematical entityi is reached. The process of inserting knots is described in [6].
From the geometrical and the parametrization points of view, the defined curve is completely equivalent to the original one. If we have a degree curve and defining points with the following values:
|
After inserting these knots, the number of control points of the curve will increase. The new number of points will Bézier equal to the sum of the difference between the original multiplicities and the order of each of the original knots.
Taking the list of points and grouping them in sets of points, it is possible to buid successive Bézier curves with the same degree than the original curve and the same continuity between successive Bézier curves. These new curves will not depend on the list of knots and, therefore, their shape will not change if any of the knots is moved. Consequently, the increments between each groups of knots can be recomputed in order to obtain a better parametrization. A possible modification based in the chord length parametrization consists in creating the following new list:
|
where in (17) is the length of the corresponding Bezier curve and is the total length.
The new curve parametrized in this way will have the same geometrical shape than the original one but with a different parametric definition. Figure fig:conv-to-bezier shows the typical improvement than can be obtained with the described algorithm.
5 CONVERSION TO SIMILAR CUBIC ENTITY
In some cases, the correction described in the last section is not enough for ensuring a good parametrization. Typically, these cases arise when one or more control points are repeated, or else when the orders of magnitude of the distances between points have big discrepancies between them.
|
|
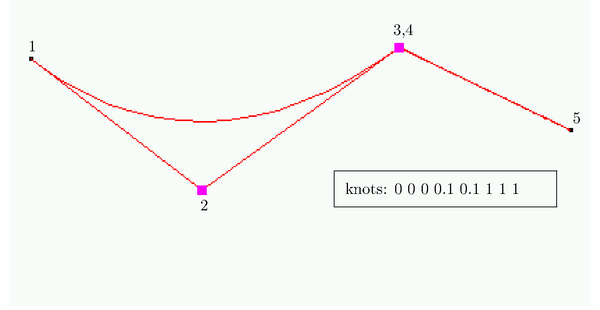
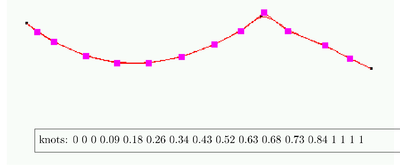
| Figure 6: Conversion of a NURBS to an approximated interpolant cubic NURBS. | |
In these cases it is acceptable to use a new curve or surface not identical to the original one but with a good enough approximation. We should keep in mind that the exchange of CAD files is always carried out with different geometrical tolerances. Hence, it seem logical to allow geometrical changes below the limits of this tolerance.
The process consists of computing a set of points belonging to the interior of the curve. These points will be the base of an interpolation algorithm that will be used for the definition of the new curve with the required approximation to the original one. The criteria for the selection of the number of points is obtained by correlating the number of control points with the accepted tolerance. A new cubic curve can be interpolated from the new set of points using different procedures like the one described in [6]. Figure 6 shows an example of this type of conversion. In this case, the discrepancy between both curves is high due to a point with continuity.
6 UNION OF CURVES
It is possible to convert a set of connected NURBS curves into a single curve. Normally, it is advantageous to keep the number of curves as small as possible because it can make the mesh generation task easier. Typically, the presence of extremely small segment lines can increase the complexity of the mesh generation.
|
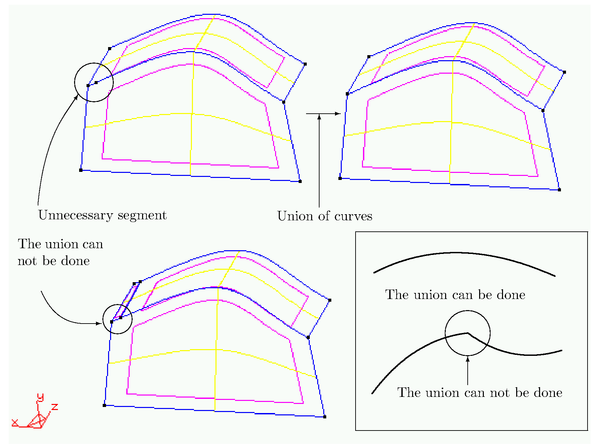
| Figure 7: Different criteria for accepting (or not) the union of curves. |
The criteria for joining different curves are the following:
- Enough degree of continuity between the different segments must exist. Typically, a continuity is considered as enough.
- None of the segments can support any individual surface patch. The set of segments to be joined must belong to the boundaries of the same surface patches.
Figure 7 shows different examples of these situations.
Before the union can proceed, the different curves must have the same degree. Hence, the degree of all the segments will be increased until they reach the maximum value . Next, the different control points will be joined and a new list of knots will be computed starting from the original ones in the following way:
|
where and in (21) are the respective lengths of the curves.
7 SUBDIVISION OF CURVES
Some of the algorithms related with the mesh generation task solve small non linear systems of equations that involve the derivatives of the analytical expression defining the curves. The presence of strong changes of these derivatives inside the curve can produce convergence difficulties in the solution of the mentioned systems. Due to this reason, it is very convenient to maintain a continuity over the whole curve (In practice, small angle discontinuities can also be allowed). Hence, it is convenient to subdivide (cut) the original curves at points not satisfying the required continuity.
This subdivision is made through the insertion of additional knots at the required cutting points until a multiplicity equal to the order of the curve is reached. The new curves will be:
|
|
The control points will be simply spread depending on the number of knots corresponding to each curve.
8 REORIENTATION OF THE BOUNDARY OF THE SURFACES
Some of the mesh generation algorithms require a proper orientation of all the boundary curves. A curve that belongs to the boundary of a surface with a normal vector is considered as well oriented if the vector defined by
|
|
always points towards the interior of the surface.
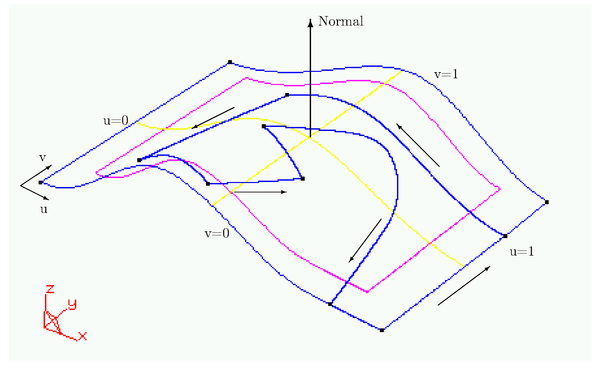
|
| Figure 8: Criterion of signs and orientations of the trimming lines of a trimmed surface. |
In some cases, the information imported from a CAD system does not satisfy the mentioned criterion. It is then convenient to check this possibility and to change the corresponding orientation when necessary.
Nevertheless, some times it is not easy to identify the interior of a surface. In this work, we use the fact that for non trimmed surfaces the curves must belong to the boundary of a NURBS surface. For trimmed surfaces, it is necessary to look for any of the trimming curves placed on the surface.
A boundary line of a NURBS surface patch is well oriented if:
|
where is the parametric surface. If the curve lays on or the corresponding similar expressions will be used.
An additional convenient check consists of computing the normal vector to the surface in its center and to compute the approximated normal vector to the boundary curves. The approximate normal vector can be computed as:
|
|
(24) |
where is the center of the surface. The boundary curves will be well oriented if:
|
|
9 COLLAPSE OF SMALL ANGLES
A very common problem in files imported from CAD systems is that some of the surfaces contain almost null angles that make impossible the generation of a proper mesh. In those cases, it is convenient to collapse part of the lines that define these angles until converting the angles into bigger ones allowing to place acceptable mesh elements.
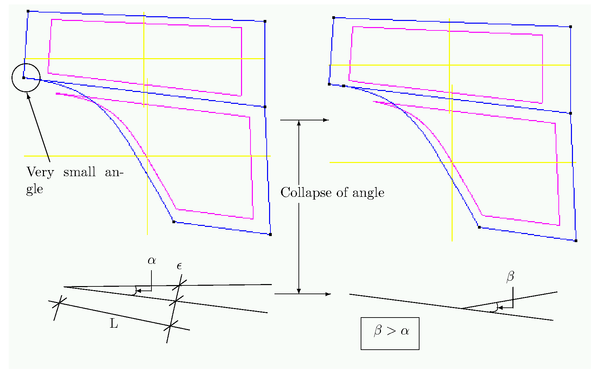
|
| Figure 9: Collapse of a too small angle. The collapse will be accepted if is bigger than a minimum value. |
The collapsing angle will be computed depending on the given tolerance . In general, the resulting criterion should guarantee that the size of the resulting curve is in agreement with the rest of the contiguous curves (see Figure 9).
10 EXAMPLES
The algorithms presented in previous sections have been implemented into the GiD pre/postprocessing system[7] developed at CIMNE. The following examples are a set of representative applications of these algorithms for the preparation of different geometries in order to be meshed. Typically, the geometry has been defined using a CAD system and the corresponding information has been introducind into GiD using standard CAD files (IGES, VDA, ...). In all cases, the use of the presented algorithms has carried out the improvements/reparations needed to allow meshing of the geometry without the necessity of any additional operation.
10.1 Geometry of a set of casting teeth
This example (see Figures 10 and 11), corresponds with the generation of a finite element mesh over the solid model of a casting set of teeth. The number of surface patches used for the geometry definition is around 400. In this particular case, before the mesh generation it has been necessary to correc the geometry in order to create a closed volume (without gaps). The final obtained mesh has around 40,000 elements.
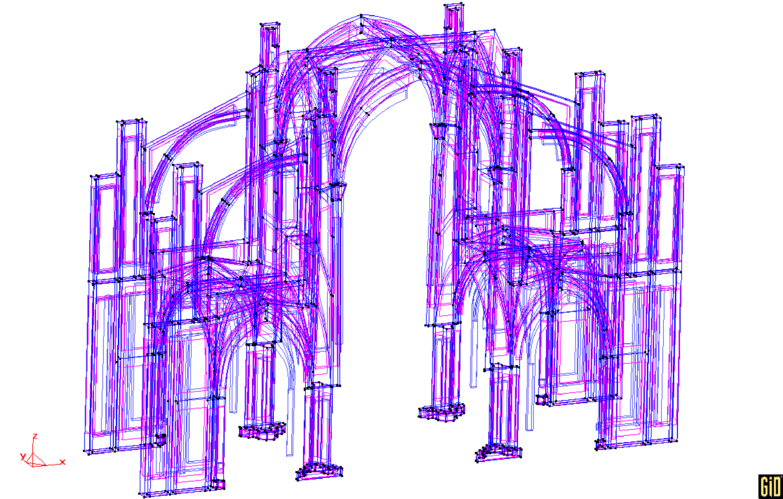
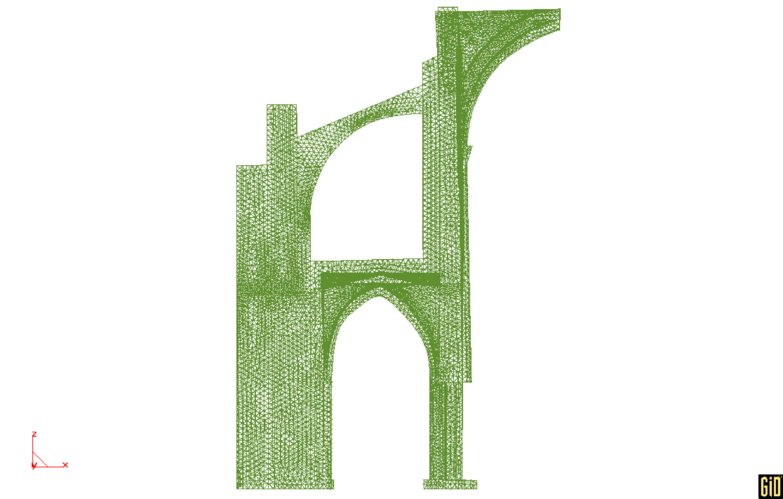
10.2 Tarazona cathedral
Figures 12 and 13 represent a structural analysis model with a non-linear damage material model of the Tarazona cathedral. In this case, it has been necessary to correct many of the surfaces used to describe the fine details of the shape in some parts of the geometry. The final mesh has around 40,000 elements.
10.3 Sheet stamping processes
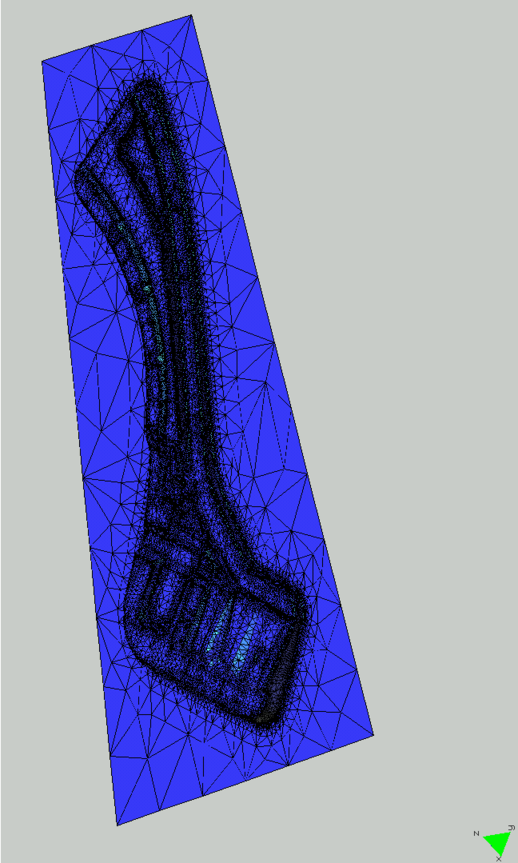
This is a typical case corresponding with a sheet stamping analysis (see Figure 14). The geometry has been modeled using traditional CAD systems and before proceeding to the classical mesh generation operations it has been necessary to use all the correction algorithms presented in these pages. Some of the problems that usually appear in this type of geometries are:
- Some surfaces are too small and must disappear.
- Other surfaces have a bad mathematical description.
- Some of them are correctly defined but with some properties that are not suitable for meshing on them.
- Some of the geometrical details are very small and produce extremely complex geometries.
Figure 14 shows a typical mesh for this type of cases with around 400,000 finite elements.
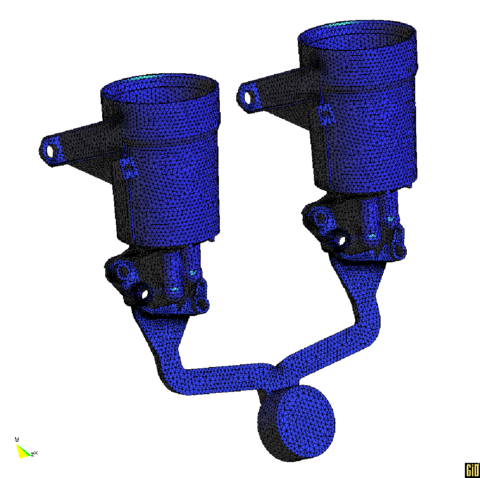
10.4 Aluminium casting
These type of geometrical models have the same problems as the previous one. However, they are more complicated to improve due to the inherent complexity of their surface patches. See Figures 15 and 16.
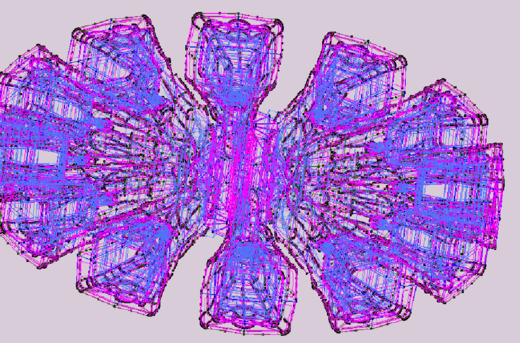
|
| Figure 10: Geometry of a set of casting teeth for construction machines. This set is the one used in the casting process. |
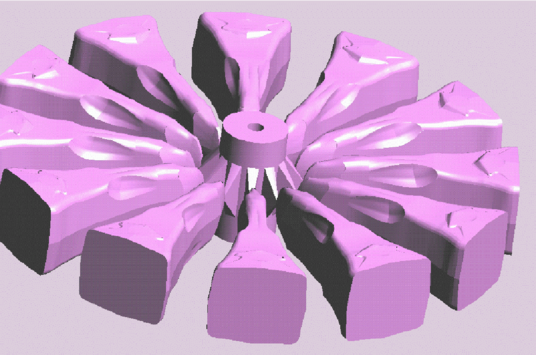
|
| Figure 11: Fotorrealistic render of the previous geometry. |
|
| Figure 12: Geometry of the Tarazona cathedral (Spain). |
|
| Figure 13: Mesh of the cathedral. |
|
| Figure 14: Analysis of sheet stamping processes. |
|
| Figure 15: Mesh of an aluminium casting model. |
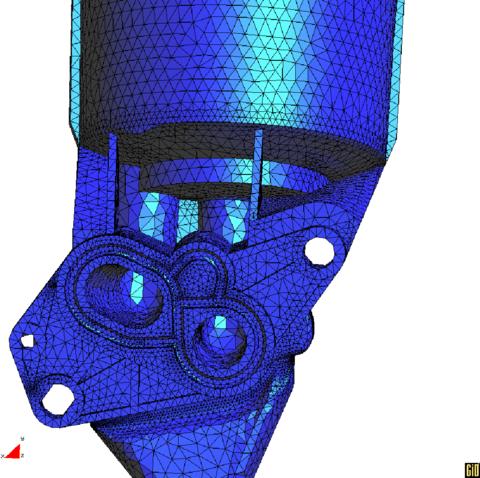
|
| Figure 16: Detail of the previous mesh. |
11 CONCLUSIONS
CAD models are not always best suited as starting points for mesh generation. CAD models and the corresponding exchange files are more suited for design and CAM operations than for the analysis task. For this reason, it is normally necessary to repair the CAD models in order to make them suitable for mesh generation.
The proposed algorithms have shown to be efficient in dealing with three different problems:
- The elimination of some small features that are necessary for the design but are not important for the numerical analysis.
- The correction of some mistakes and accuracies that are found in many geometrical interchange files.
- The change in the mathematical definition of some entities in order to make them better suited for mesh generation.
All these algorithms can be executed automatically as a filter to the imported or created geometry reducing the human interaction to a minimum and facilitating a lot the mesh generation task.
An academic version of the GiD pre/postprocessing system, where the algorithms presented in this paper have been implemented, can be freely downloaded at
BIBLIOGRAPHY
[1] R. Löhner and P. Parikh. (1988) "Generation of three-dimensional unstructured grids bythe advancing front method". Int. j. numer. methods fluids. 8
[2] P. L. George. (1991) "Automatic Mesh Generation. Application to Finite Element Methods". Wiley
[3] J M Le Gouez and M A Boheas and C J Miles. (1995) "Data requirements for analysis modelling". NAFEMS
[4] NAFEMS. (1996) "Integrate CAD and Analysis"
[5] Ramon Ribó. (2000) "Development of an integrated system for the geometry dealing, mesh generation and data for the finite element analysis"
[6] Gerald Farin. (1973-1993) "Curves and surfaces for CADG". ACADEMIC PRESS, INC., Third Edition
[7] Ramon Ribó and others. (1998) "GiD reference manual". CIMNE
[8] D.N.Knuth. (1973) "The art of computer programming, Vol. 3". Addison-Wesley
[9] Hoschek, Josef and Dieter Lasser. (1993) "Fundamentals of computer aided geometric design". Addison-Wesley
[10] Foley and van Dam and Feiner and Hughes. (1993) "Computer Graphics. Principles and practice". Addison-Wesley, second Edition
[11] P. Lancaster and K. Salkauskas. (1988) "Curve and Surface Fitting". Academic press, first Edition
[12] O. C. Zienkiewicz and R. Taylor. (2000) "The Finite Element Method", Volume I. John Wiley and Sons, 5 Edition
[13] Adi Levin. (1999) "Interpolating nets of curves by smooth subdivision surfaces". Computer Graphics Proceedings (SIGGRAPH)
[14] Eugenio Oñate. (1995) "Cálculo de estructuras por el método de los elementos finitos". CIMNE
Document information
Published on 01/01/2002
DOI: 10.1016/S0045-7949(02)00105-0
Licence: CC BY-NC-SA license
