Abstract
Incoloy 800HT which was selected as one of the prominent material for fourth generation power plant can exhibit appreciable strength, good resistance to corrosion and oxidation in high temperature environment. This study focuses on the multi-objective optimization using grey relational analysis for Incoloy 800HT welded with tungsten inert arc welding process with N82 filler wire of diameter 1.2 mm. The welding input parameters play a vital role in determining desired weld quality. The experiments were conducted according to L9 orthogonal array. The input parameter chosen were the welding current, Voltage and welding speed. The output response for quality targets chosen were the ultimate tensile strength and yield strength (at room temperature, 750 °C) and impact toughness. Grey relational analysis was applied to optimize the input parameters simultaneously considering multiple output variables. The optimal parameters combination was determined as A2 B1 C2 i.e. welding current at 110 A, voltage at 10 V and welding speed at 1.5 mm/s. ANOVA method was used to assess the significance of factors on the overall quality of the weldment. The output of the mechanical properties for best and least grey relational grade was validated by the metallurgical characteristics:
Keywords
Optimization ; Multi-objective ; Mechanical properties ; Metallurgical characteristics
1. Introduction
Incoloy 800H is an austenitic iron-nickel-based super alloy that has good strength and appreciable resistance oxidation and carburization at high temperatures [1] . This alloy was selected as one of the prominent material for IV generation nuclear power plants. The superior mechanical property combines with resistance to high temperature corrosion and makes this alloy useful for many applications involving long-term exposure to elevated temperatures in corrosive atmospheres. Other applications of Incoloy 800H are super heater tubes in power generation units and in high temperature heat exchanger tubes in gas-cooled nuclear reactors [2] . TIG welding uses a non-consumable electrode and shielded by an inert gas like helium or argon to protect the molten weld pool and red hot filler wire from atmospheric contaminants. TIG welding is a multi-objective and multi-factor metal fabrication technique. This process can be used for joining a number of common metals such as steel, magnesium and aluminum of thickness 1-6 mm in almost all positions [3] . The process parameters interact directly or indirectly on the weld bead geometry, mechanical and metallurgical properties of the weldments. The quality of the weld joint has an essential dependence on the input process parameter [4] . The control of input process parameters was a common problem to manufacturer to obtain a good welded joint with the required weld quality [5] . Traditionally, skilled operators or engineers choose parameters based on trial and error method which was time consuming for every new welded product to obtain a welded joint with the required specifications. Then welds are examined to determine whether they meet the specification or not [6] . Nowadays, application of design of experiment (DoE), evolutionary algorithms and computational network are widely used to develop mathematical relationships between the welding process input parameters and the output variables of the weld joint in order to determine the welding input parameters that lead to the desired weld quality. Sapkal and Teslang [7] applied Taguchi method to optimize the process parameter current, voltage and welding speed to obtain maximum depth of penetration on mild steel. Patel and Chaudhary [8] investigated the effect of process parameter on the weld bead hardness of AISI 1020 material for TIG and MIG welding processes using GRA. Balasubramanian [9] obtained mathematical model equations for pulsed TIG welding of titanium sheets and concluded that the mathematical relationships developed can be employed easily in automated welding in the form of a program, for obtaining the desired weld bead dimensions. Haragopal et al. [10] optimized the process parameters for enhancing the mechanical properties of MIG welded aluminum alloy joints. The experiments was conducted according to l9 orthogonal array. It was concluded that current was the most significant factor on ultimate tensile strength and pressure for impact energy. Sathish et al. [11] optimized the TIG welding parameters for dissimilar pipe joints using Taguchi method. They concluded that higher heat input resulted in lower tensile strength. Padmanabhan et al. [12] optimized the pulsed TIG parameters in using GRA to obtain maximum tensile strength on AZ31B magnesium alloy. Aydin et al. [13] studied optimization of friction stir welding process for an optimal parametric combination to yield favorable tensile strength and elongation using the Taguchi based Grey relational analysis. Sathiya et al. [14] optimized the friction welding process parameter of Incoloy 800H joints using artificial neural network and concluded that the low heating pressure, upsetting time and high upsetting pressure, heating time to obtain sound quality joint. From the above literatures, it is clear only a few works have been carried out in optimization and characterization of Incoloy 800HT. It was also clear that GRA can be used to optimize the TIG welding process parameter to obtain the desired quality weldments. In this work, multi-objective optimization using GRA has been carried out to optimize the TIG welding process parameter (welding speed, current and voltage). The output response was tensile strength and yield strength (room temperature, 750 0 C) and impact toughness. By analyzing the grey relational grade, the most influential factor was determined. ANOVA method was applied to find the effect of individual factors. Further, the best and least grey grade obtained experiments mechanical properties were validated by their metallurgical features like micro structure and SEM fractography.
2. Experimental procedure
Incoloy 800HT plates of dimension 150 × 100 × 4 mm was butt welded using Lincoln TIG machine, with Polarity Direct Current Electrode Negative [DCEN]. The chemical composition of the base material is given in Table 1 . The input process parameters used for welding were the welding current, voltage and welding speed. Argon was used as the shielding gas at the flow rate of 15 lpm. Several trials were carried out to select the upper and lower levels of the process parameter. Taguchi L9 orthogonal array was selected, and the experiments were carried out accordingly. The process parameter and their levels are given in Table 2 . The objective function chosen were the ultimate tensile strength and yield strength (room temperature, 750 °C) and impact toughness. The tensile test and hot tensile test were carried out according to ASME SEC IX standard. The impact test was carried out according to ASTM E23-04 guidelines. The measured values are presented in Table 3 . The welded specimens were cut in the weld cross section and were polished with different grades of emery sheet followed by alumina polishing and diamond polishing to get 0.05 µm finish. The etchant used for revealing the micrograph of the joint was 15 ml HCL+10 ml HAC+10 ml HNO3 . Metallographic analyses like microstructure and SEM fractographic analysis were done to find the characteristics of the weldments.
| C | Mn | S | Si | Cu | Cr | Fe | Al | Ti | Ni |
|---|---|---|---|---|---|---|---|---|---|
| 0.065 | 0.688 | <0.010 | 0.094 | 0.091 | 20.79 | 46.30 | 0.477 | 0.380 | 30.65 |
| Factor | Unit | Level 1 | Level 2 | Level 3 |
|---|---|---|---|---|
| Welding Current | A | 90 | 110 | 130 |
| Voltage | V | 10 | 12 | 14 |
| Welding Speed | mm/s | 1.2 | 1.5 | 1.8 |
| Exp. no. | Welding current (A) | Voltage (V) | Welding speed (mm/s) | UTS [R.T] (MPa) | Y.S [R.T] (MPa) | UTS [750 °C] (MPa) | Y.S [750 °C] (MPa) | Toughness (J) |
|---|---|---|---|---|---|---|---|---|
| 1 | 90 | 10 | 1.2 | 614.34 | 407.58 | 584.34 | 390.19 | 54 |
| 2 | 90 | 12 | 1.5 | 617.87 | 404.79 | 591.05 | 393.94 | 60 |
| 3 | 90 | 14 | 1.8 | 592.13 | 442.33 | 570.51 | 357.31 | 56 |
| 4 | 110 | 10 | 1.5 | 628.07 | 426.41 | 596.64 | 403.31 | 60 |
| 5 | 110 | 12 | 1.8 | 593.23 | 394.9 | 581.28 | 403.36 | 56 |
| 6 | 110 | 14 | 1.2 | 612.8 | 400.46 | 581.08 | 390.92 | 58 |
| 7 | 130 | 10 | 1.8 | 592.51 | 403.63 | 569.47 | 363.66 | 52 |
| 8 | 130 | 12 | 1.2 | 568.14 | 394.2 | 544.08 | 337.2 | 53 |
| 9 | 130 | 14 | 1.5 | 588.17 | 386.62 | 565.13 | 360.77 | 52 |
3. Grey relational analysis (GRA)
The transformation of S–N ratio values from the original response values was the initial step. For that the equation (1) of ‘larger the better’ was used. Subsequent analysis was carried out on the basis of these S/N ratio values. This is shown in Table 4 .
|
|
( 1) |
| Exp. no. | UTS [R.T] | Y.S [R.T] | UTS [750 °C] | Y.S [750 °C] | Toughness |
|---|---|---|---|---|---|
| 1 | 55.76818 | 52.20426 | 55.33331 | 51.82552 | 34.64788 |
| 2 | 55.81794 | 52.1446 | 55.43248 | 51.9086 | 35.56303 |
| 3 | 55.44834 | 52.91493 | 55.12527 | 51.0609 | 34.96376 |
| 4 | 55.95961 | 52.59655 | 55.51425 | 52.11278 | 35.56303 |
| 5 | 55.46446 | 51.92974 | 55.28771 | 52.11386 | 34.96376 |
| 6 | 55.74638 | 52.05118 | 55.28472 | 51.84176 | 35.26856 |
| 7 | 55.45391 | 52.11967 | 55.10942 | 51.21391 | 34.32007 |
| 8 | 55.08911 | 51.91433 | 54.71326 | 50.55775 | 34.48552 |
| 9 | 55.39006 | 51.74569 | 55.04297 | 51.14461 | 34.32007 |
In GRA, initially the experimental data are normalized. By using this normalized data, grey relational coefficient are evaluated, the grey relational grade was obtained by averaging the GRC values related to selected experimental results.
3.1. Grey relational generation
GRG can be categorized into three types namely Smaller the Better, Larger the Better or Nominal is a better (NB) criterion. The preferred quality characteristics for ultimate tensile strength, yield strength and impact toughness are Larger the Better criterion; then it is expressed by using equation (2) :
|
|
( 2) |
Where i = 1,…m; k = 1,2,3,…n; m = no. of experimental data; n = no. of factors; yi (k) = original sequence; yi *(k) value after grey relational generation; min yi (k) and max yi (k) are the minimum and maximum value of yi (k), respectively. The normalized values are shown in Table 5 .
| Exp. no | UTS [R.T] | Y.S [R.T] | UTS [750 °C] | Y.S [750 °C] | Toughness |
|---|---|---|---|---|---|
| 1 | 0.78009 | 0.392195 | 0.774111 | 0.814708 | 0.263732 |
| 2 | 0.83726 | 0.341169 | 0.897923 | 0.868097 | 1 |
| 3 | 0.412675 | 1 | 0.514375 | 0.323341 | 0.517872 |
| 4 | 1 | 0.727704 | 1 | 0.999308 | 1 |
| 5 | 0.431194 | 0.157415 | 0.717176 | 1 | 0.517872 |
| 6 | 0.755046 | 0.261278 | 0.713444 | 0.825141 | 0.763093 |
| 7 | 0.419077 | 0.31985 | 0.494589 | 0.421668 | 0 |
| 8 | 0 | 0.144235 | 0 | 0 | 0.13311 |
| 9 | 0.345721 | 0 | 0.41163 | 0.377132 | 0 |
3.2. Grey relational coefficient (GRC)
The calculation for grey relation coefficient was done using equation (3) :
|
|
( 3) |
Where is the grey relation coefficient; is deviation among and ; ; , .
3.3. Grey relation grade
The grey relational grades (GRG) (Ґi) are determined by taking average of the GR Coefficient related to every observation as presented in equation (4) :
|
|
( 4) |
Where, Q = total quantity of responses and n denotes the quantity of output responses. The GRG Ґi represents level of relationship among the reference or ideal sequence and the comparative sequence. If larger GRG is obtained for the equivalent set of process parameters compared to other sets, it is considered as the most favorable optimal setting.
4. Results and discussion
TIG welding on Incoloy 800HT was performed according to L9 orthogonal array to investigate the effect of the welding process parameters, namely, welding current, voltage and welding speed on the output responses, ultimate tensile strength, yield strength and impact toughness. An effort has been taken to determine the best possible set of welding parameters for welding the Incoloy 800HT effectively and efficiently.
4.1. Multiple response models using GRA
By using GRA complicated optimization, problem can be solved effectively. The higher grey relational grade will have better multi-response characteristics. Table 6 shows the grey relational grade for all experiments. Hence, it is clear that experiment 4 has the optimal parameters setting for best multi-response characteristics, such as ultimate tensile strength, yield strength and toughness.
| Exp. no. | Grey relation coefficient | Grey relation grade | Rank | ||||
|---|---|---|---|---|---|---|---|
| UTS [R.T] | Y.S [R.T] | UTS [750 °C] | Y.S [750 °C] | Toughness | |||
| 1 | 0.694531 | 0.451343 | 0.688811 | 0.729616 | 0.404443 | 0.593749 | 5 |
| 2 | 0.754443 | 0.431469 | 0.830459 | 0.791261 | 1 | 0.761526 | 2 |
| 3 | 0.459844 | 1 | 0.507292 | 0.424932 | 0.509099 | 0.580233 | 6 |
| 4 | 1 | 0.64742 | 1 | 0.998618 | 1 | 0.929208 | 1 |
| 5 | 0.467812 | 0.372416 | 0.638713 | 1 | 0.509099 | 0.597608 | 4 |
| 6 | 0.671182 | 0.403642 | 0.635683 | 0.740896 | 0.678512 | 0.625983 | 3 |
| 7 | 0.462567 | 0.423675 | 0.497309 | 0.463679 | 0.333333 | 0.436113 | 7 |
| 8 | 0.333333 | 0.368796 | 0.333333 | 0.333333 | 0.365794 | 0.346918 | 9 |
| 9 | 0.433171 | 0.333333 | 0.459402 | 0.445288 | 0.333333 | 0.400906 | 8 |
4.2. Response table for GRG using S/N ratio
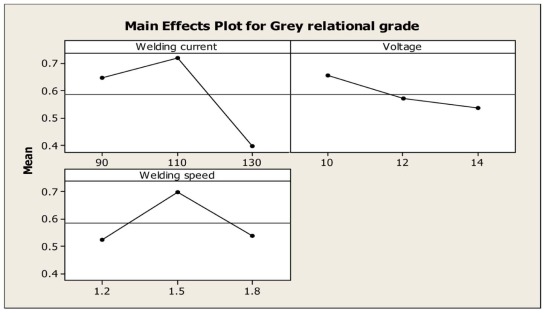
The average grey relational grade value for every level of the input parameters is shown in Table 7 . These have been calculated by taking the average for each level group in all the levels of process parameters. Since it denotes the level of correlation between reference sequence and obtained sequence, the higher value of average grey grade indicates stronger correlation between them. It indicates optimal level of process parameters. It depicts that the optimal set of process parameter is A2 B1 C2 , which means the current of 110 A, voltage of 10 V and welding speed of 1.5 mm/s. Current was the main influencing factor, followed by the welding speed and voltage. Fig. 1 shows the main effect plot of grey relation grade.
| Symbol | Parameter | Level 1 | Level 2 | Level 3 | Main effect (max–min) | Rank |
|---|---|---|---|---|---|---|
| A | Current | 0.645169 | 0.717599 | 0.394645 | 0.322954 | 1 |
| B | Voltage | 0.653023 | 0.568684 | 0.535707 | 0.117315 | 3 |
| C | Welding speed | 0.522216 | 0.697213 | 0.53798 | 0.174996 | 2 |
|
|
|
Fig. 1. Main effect plot of grey relation grade.
|
4.3. Analysis of variance for welding parameters
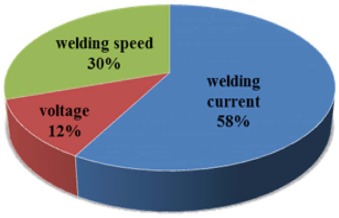
ANOVA is a method of computation that significantly assesses the contribution of each parameter variation made by the overall response variation. It is used to determine the significance of input parameters. The statistical software Minitab 16.0 is employed to investigate the significance of welding parameters, namely welding current, voltage and welding speed. ANOVA is calculated using GRG for analyzing the importance of process parameters. From analysis of variance, it was clear that the welding current (58%) influences most in determining the quality of the weld joint and it is followed by welding speed (30%) and voltage (12%). ANOVA table shows that the results are closely related with grey relational analysis. The outcomes of ANOVA are shown in Table 8 . The influence of TIG welding process parameters on the output response is shown in Fig. 2 .
| Symbol | Factor | DOF | Sum of squares | Mean sum of squares | F | % contribution |
|---|---|---|---|---|---|---|
| A | current | 2 | 0.172308 | 0.086154 | 7.845179 | 58.09329 |
| B | Voltage | 2 | 0.021964 | 0.010982 | 1.589692 | 11.77162 |
| C | Welding speed | 2 | 0.056226 | 0.028113 | 4.069579 | 30.1351 |
| Error | 2 | 0.013816 | 0.006908 | |||
| Total | 8 | 0.264314 |
|
|
|
Fig. 2. Percentage contribution of individual parameters.
|
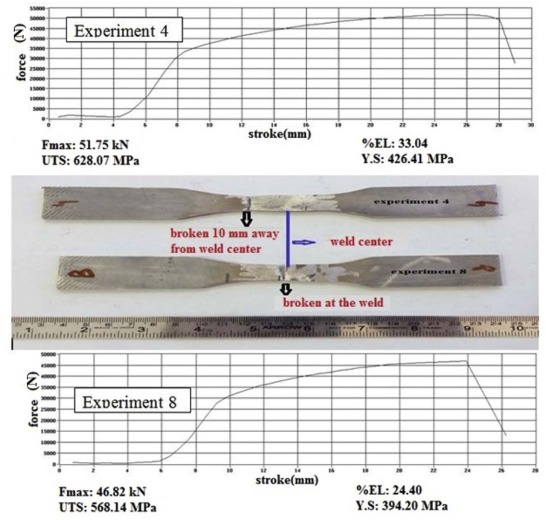
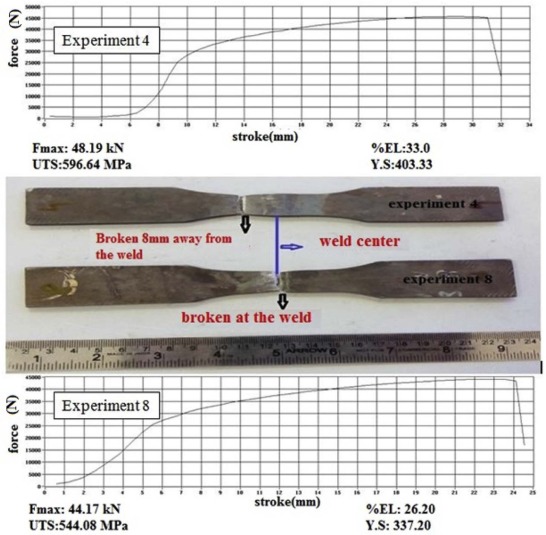
Tensile testing is one of the most basic types of mechanical test used to qualify a welding procedure. By performing this test, it is easy to determine how the material will react to forces being applied in tension. As the material is being pulled, the strength of the weld joint along with the elongation can be found. The point of failure is of much importance, and it is typically called as ultimate tensile strength. The base material ultimate tensile strength of Incoloy 800HT in and as received condition was 530 MPa. All the welded specimen exhibited higher strength than the base material. This section discusses why there was variation in output response for experiment 4 and 8 in relation to some of the metallurgical characteristics. Fig. 3 shows the fractured location for the tensile tested specimens. From the figure, it is seen that the fracture location is 10 mm away from the weld center for experiment number 4, whereas the fracture occurred in the weld region for experiment number 8. From the output result obtained during tensile testing, the % elongation is 9 percent more for experiment 4 as compared to experiment 8. Alloy 800HT finds wide applications in hot environments. Fig. 4 shows the hot tensile tested sample fracture location. The hot tensile result showed that experiment 4 has higher strength than experiment 8. From the results, it is clear that the alloy 800H could withstand high temperatures without losing its strength. As compared to room temperature tensile properties, the high temperature tensile showed good strength with only a small amount of loss in strength.
|
|
|
Fig. 3. Figure showing the fracture location of the tensile tested samples at room temperature.
|
|
|
|
Fig. 4. Figure showing the fracture location of the tensile tested samples at 750 °C.
|
4.4. Fractography analysis
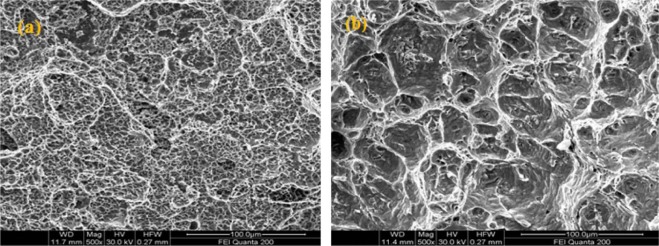
The impact tested specimen was analyzed on the fractured surface by scanning electron microscope to investigate the type of fracture that has occurred. There were two types of fracture, brittle and ductile, depending on the ability of the material to undergo plastic deformation before the fracture. The ductile mode of fracture undergoes extensive plastic deformation ahead of the crack, and the crack was stable which could resist further extension unless the applied stress was increased. In brittle mode, the crack was unstable and propagated rapidly without increase in applied stress. The ductile mode of fracture is preferred in most of the applications. Fig. 5a corresponds to the fractographic images taken for experiment 4 showed deep and wide dimples which revealed ductile fracture mode, whereas Fig. 5b which corresponds to experiment 8 showed mostly cleavages which revealed brittle mode of failure.
|
|
|
Fig. 5. Fractography of impact tested specimen (a) experiment 4 (b) experiment 8.
|
4.5. Microstructure analysis
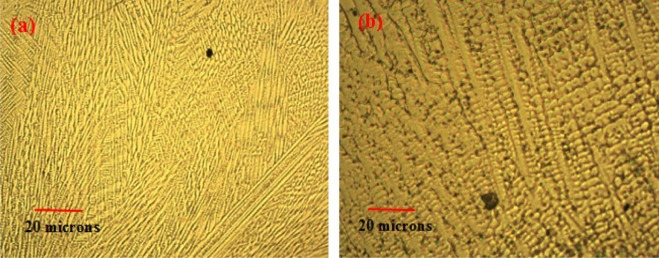
The microstructure of the weld region for experiments 4 and 8 is shown in Fig. 6a & b . The microstructure for experiment 4 shows fully austenitic structure with fine cellular and equiaxed grains all over the weld regions, whereas the weld zone microstructure showed harder dendritic structures, which were more prone to cracking. The harder dendritic structure may be due to the higher heat input during the welding. The structure of the weld zone clearly explains why there was a variation in mechanical strength for experiment 4 and 8.
|
|
|
Fig. 6. Microstructure of the weld region(a) experiment 4 (b) experiment 8.
|
5. Conclusions
In this study, Taguchi L9 array with grey relational analysis has been used to optimize the multiple performance characteristics such as ultimate tensile strength and yield strength (room temperature, 750 °C) and impact toughness. An optimum combination of three test parameters of grey relational grade for quality weld joints was found to be welding current of 110 A, voltage of 12V and welding speed of 1.5 mm/s. Based on the ANOVA results of GRG, it was observed that the welding current (58%) exerted a significant influence on multiple responses followed by welding speed (30%) and voltage (12%). The mechanical properties were correlated with the metallurgical characteristics. The impact fractography analysis showed ductile mode of fracture for experiment 4 and mixed mode of brittle and ductile fracture for experiment 8. The microstructure of the weld region revealed finer cellular structure for experiment 4, whereas harder dendrites were formed for experiment 8 due to higher heat input.
References
- [1] B. Gleeson, B. Li; Cyclic Oxidation of Chromia-Scale Forming Alloys, Lifetime Prediction and Accounting for the Effects of Major And Minor Alloying Additions; Les Embiez, France (2004)
- [2] A. Rahmel, H.J. Grabke, W. Steinkusch; Carburization – introductory survey; Mater. Corros. , 49 (1998), pp. 221–225
- [3] P. Kumar, K.P. Kolhe, S.J. Morey, C.K. Datta; Process parameters optimization of an aluminium alloy with pulsed gas tungsten arc welding (GTAW) using gas mixtures; Mater. Sci. Appl, 2 (2011), pp. 251–257
- [4] S. Datta, A. Bandyopadhyay, P.K. Pal; Int. J. Adv. Manuf. Technol, 39 (2008), pp. 1136–1143
- [5] F. Kolahan, M. Heidari; A new approach for predicting and optimizing weld bead geometry in GMAW; Int. J. Aerosp. Mech. Eng, 5 (2) (2011), pp. 138–142
- [6] S. Subramaniam, D.R. White, J.E. Jones, D.W. Lyons; Experimental approach to selection of pulsing parameters in pulsed GMAW; Weld. Res. Suppl (1999), pp. 66–172
- [7] S.V. Sapakal, M.T. Telsang; Parametric optimization of MIG welding using Taguchi design method; Int. J. Adv. Eng. Res. Study, 1 (2012), pp. 28–30
- [8] N.P. Chandresh, S. Chaudhary; Parametric optimization of weld strength of metal inert gas welding and tungsten inert gas welding by using analysis of variance and grey relational analysis; Int. J. Res. Mod. Eng. Emerg. Technol, 1 (3) (2013), pp. 48–56
- [9] M. Balasubramanian; Prediction of optimum weld pool geometry of PCTIG welded titanium alloy using statistical design; Eng. Sci. Technol. Int. J. (2015) http://dx.doi.org/10.1016/j.jestch.2015.06.001
- [10] G. Hargopal, P.V.R. Ravindrareddy, G. Chandra Mohan Reddy, J.V. Subrahmanyam; Parameter design for MIG welding of Al- 65032 alloy using Taguchi technique; J. Sci. Ind. Res, 70 (2011), pp. 844–850
- [11] R. Sathish, B. Naveen, P. Nijanthan, K. Arun Vasantha Geethan, R. Vaddi Seshagiri; Weldability and process parameter optimization of dissimilar pipe joints using GTAW; Int. J. Eng. Res. Appl, 2 (3) (2012), pp. 2525–2530
- [12] G. Padmanaban, V. Balasubramanian; Optimization of pulsed current gas tungsten arc welding process parameters to attain maximum tensile strength in AZ31B magnesium alloy; Trans. Nonferrous Met. Soc. China, 21 (3) (2011), pp. 467–476
- [13] A. Hakan, A. Bayram, E. Ugur, Y. Kazancoglu, G. Onur; Application of Grey relational analysis and Taguchi method for the parametric optimization of friction stir welding process; Mater. Technol, 44 (4) (2010), pp. 205–211
- [14] K. Anand, Birendra Kumar Barik, K. Tamilmannan, P. Sathiya; Artificial neural network modeling studies to predict the friction welding process parameters of Incoloy 800H joints; Eng. Sci. Technol. Int. J., 18 (2015), pp. 394–407
Document information
Published on 10/04/17
Licence: Other
Share this document
claim authorship
Are you one of the authors of this document?

