(Created page with " <div class="center" style="width: auto; margin-left: auto; margin-right: auto;"> M.Â.M. Rodrigues<sup>a</sup>, M. Freitas<sup>a</sup>, A.T. Marques<sup>a,b</sup>, A.M.P de...") |
m (Materiales.Compuestos moved page Draft Compuestos 935232482 to Review 673805203381) |
(No difference)
| |
Revision as of 15:40, 2 May 2022
1 Introduction
Nowadays, Fiber Reinforced Plastics (FRP) are materials widely used on the industrial sector, with a growing demand for this kind of materials. For high performance applications, such as in the aeronautic and automobile industry, Carbon Fiber Reinforced Plastics (CFRP) is the composite material of choice thanks to its combination of low weight and high properties (e.g. Young’s Modulus and Ultimate Strength). CFRP is sometimes combined with layers of a metallic material to form Fiber-Metal Laminates (FML) which have several advantages such as better impact strength and higher fatigue resistance, by magnifying the advantages of each type of material while compensating their disadvantages [1]. Fiber-Metal Laminates are mostly applied in aeronautic applications, with the metals of choice being Aluminum, Titanium or a combination of both.
Drilling is the most used machining operation in order to make the several components ready to assembly. Drilling of CFRP presents several challenges such as high tool wear, burrs, matrix degradation and delamination. Drilling of this material combined with a metallic material brings another set of challenges including different diameters and surface roughness on each material, higher machining temperatures due to drilling of metal and increased tool wear when compared with the former.
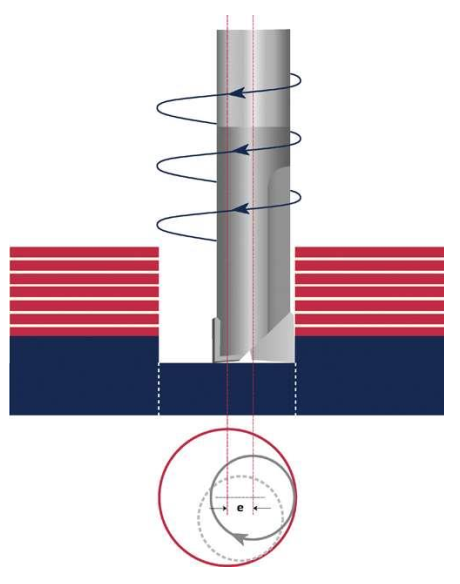
Orbital drilling is an alternative way where an end mill doing a helical path, Figure 1, is used to machine the desired holes. Several advantages are obtained, by using this operation such as obtaining different diameters with the same tool, therefore making it possible to compensate the diameter reduction due to tool wear, lower axial forces, better chip evacuation, lower machining temperatures and lower delamination [2]. Due to these advantages orbital drilling of CFRP has been subjected to several studies [3-5], as well as orbital drilling of FML [5-8].
In recent years, there has been an increasing interest on this kind of materials, by the automotive industry, with focus on Fiber-Metal Laminates composed by CFRP and Steel. Several investigations have been made regarding both the evaluation of the properties, applications and manufacturing of this hybrid composite [9-13].
Due to the interest on these materials being relatively new, there isn’t a lot of information available regarding their machining. Therefore, the scope of this paper consists on doing an initial approach to the machining of CFRP/Steel hybrid composites by investigating the influence of cutting parameters on delamination, diameter, axial forces, tool wear and overall quality of the material. An ANOVA analysis was also done to verify which of the cutting parameter has the biggest influence in the axial force values.
2 Experimental procedure
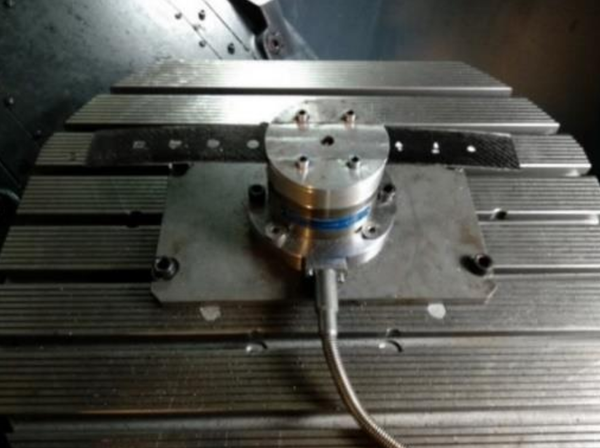
The CFRP/Steel hybrid composite material used was made of one layer of sandblasted automotive grade steel (Docol DP600) with a thickness 0.8 mm and 3 plies of woven epoxy pre-preg (Nanopith ER 150_30 B2 and Mitsubishi Rayon TR3523 361 GMP) with 0.25 mm of thickness each, for a total of thickness of approximately 1.6 mm. The laminate was manufactured on a INTOCO hot plate press with a cure time of 60 min at 135 ºC under a pressure of 1 MPa. One of obtained laminates is presented on Figure 2, as well as the fixture used to hold them during the experiments. The choice of manufacturing several stripes, able to be drilled several times, permitted to reduce time between tests.
Machining of CFRP/Steel hybrids hasn’t been vastly studied given the lack of interest shown until recent years and so a tool to machine this combination of materials hasn’t been developed unlike the already existent drills and end mills to machine Fiber-Metal Laminates composed of CFRP and titanium or aluminum.
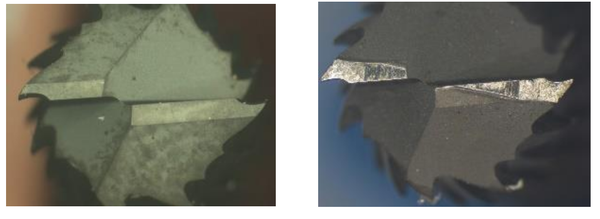
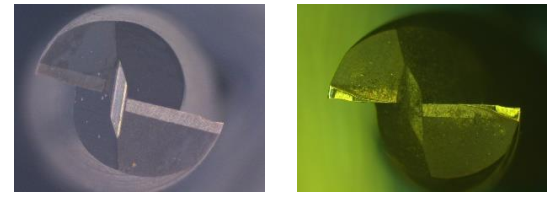
Therefore, the two 6 mm diameter end mills presented in Figure 3 and Figure 4 were used to run the experiments and drill holes with a 10mm diameter. The first, recommended to machine high strength steels, has 2 flutes and TiALN coating while the second one, advised to machine CFRP, has 2 main cutting edges and diamond coating. During the discussion of results the tool from Figure 3 will be called Tool 1 and Tool 2 to the other.
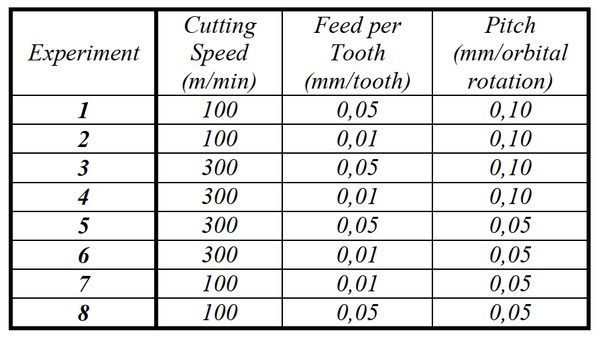
The experimental tests were performed under dry conditions on a 5-axis DMU 60 eVo DECKEL MAHO machining center. Table 1 shows the ranges of axial feeds, tangential feed rates and helical pitches used, each one having two levels. A full factorial design of experiments (DoE) was chosen for each tool, presented on Table 2. The DoE was done 3 times for each tool with each run done in a different order, presented on Table 3. Cutting forces were recorded using a KISTLER 9272 load cell connected to a 5070ª KISTLER charge amplifier and the data was gathered on the computer by means of an Advantech USB-4711A data acquisition card. The drilled holes observed on a SZH Olympus microscope and the diameters were measured using an inside micrometer.
The drilled holes observed on a SZH Olympus microscope and the diameters were measured using an inside micrometer. Each hole was measured 3 times at random points and the diameter was given by the average of these values.
Table 1 – Cutting Parameters
Table 2 – Full Factorial DoE
Table 3 – Experiments order in each run
3 Results and discussion
3.1 Tool wear
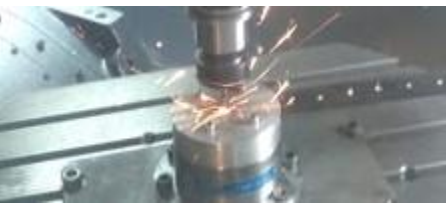
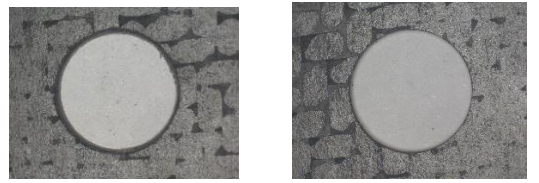
Figure 5 and Figure 6 compare the used tools in new condition and after their run of experiments. In both cases, considerable wear is visible after just 8 experiments. The higher cutting parameters (Table 2, experiments 3 to 5) proved to be very aggressive and not adequate at all for machining of this combination of materials, with sparks flying, as seen in Figure 7, as soon as the tool enters in contact with the steel layer, evidencing the lack of compatibility between this material and the used parameters.
This phenomena was more severe on the tool 1, which clearly wasn’t able to machine the steel layer on a proper manner, leading to very high tool wear due to the difficulty on penetrating this material. The more common end mill recommended to machine steel, Tool 2, showed more promising results, with lower tool wear at end of its respective run. It points out that, from a tool wear point of view, the steel layer is predominant factor.
3.2 Hole diameter
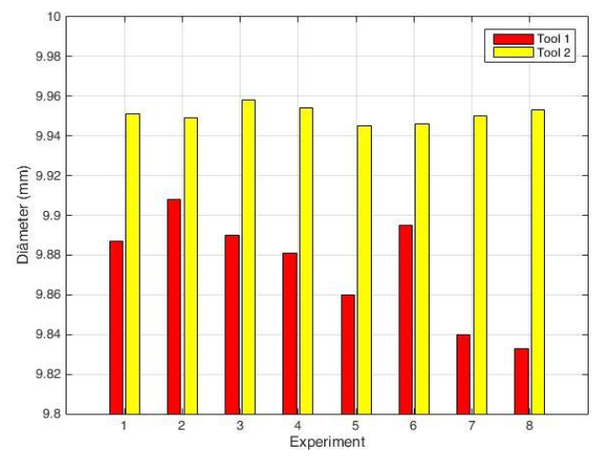
Figure 8 shows the measured diameters of the machined holes. The values correspond to the average of the measured diameters on the 3 runs. The holes made with Tool 2 are all comprised between 9.94 and 9.96 mm and aren’t affected at all by the cutting parameters used at each particular experiment. On the other hand, smaller diameters were measured with the Tool 1. Being an average of 3 runs done on different order, tool wear can be excluded to a certain extent and so it is possible to admit that for Tool 1 a higher pitch leads to a higher diameter and that the hole with the diameter closer to the objective of 10 mm was achieved with low cutting speed and low feed.
3.3 Delamination
After observing the machined holes on the microscope it was possible to conclude that entry delamination was very low and practically inexistent in all of the experiments. It should be mentioned that hole entry delamination isn’t as severe as its hole exit counterpart and that orbital drilling also brings a considerable reduction of this value. It wasn’t possible to do a detailed analysis of hole exit delamination but the combination of orbital drilling and the used fixture, proven to reduce delamination issues by Hocheng and Dharan [14], leads to think that it shouldn’t be alarmingly high.
3.4 Matrix degradation
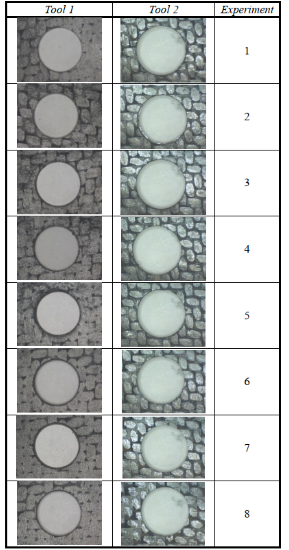
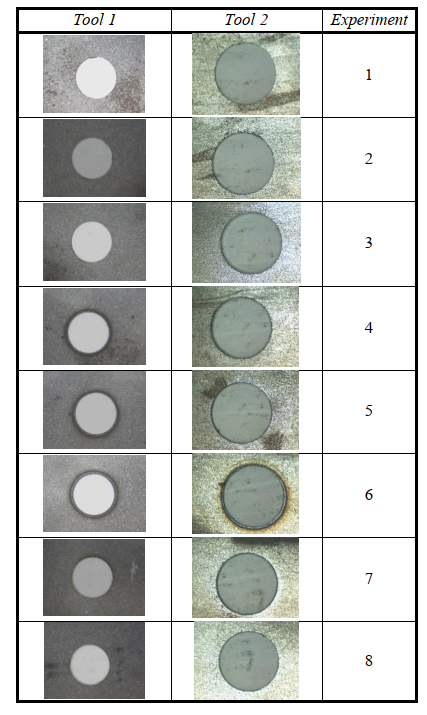
Table 4 shows the hole entrance (CFRP layer) during one run of experiments with both tools. The results with tool 2 are very satisfying while matrix degradation is visible on several holes machined with tool 1. The holes with poorer quality are those machined with higher cutting parameters (experiments 3 through 5), which wear the tool very quickly and produce very high temperatures, destroying the matrix. Due to this fact the next holes (experiments 6 through 8) shown also some matrix degradation, which are misleading results because tool wear is the main responsible and not the cutting parameters. This was verified by comparing the holes machined with the same parameters during different runs, Figure 9.
Table 4 – Hole exit during a run of experiments
3.5 Hole exit
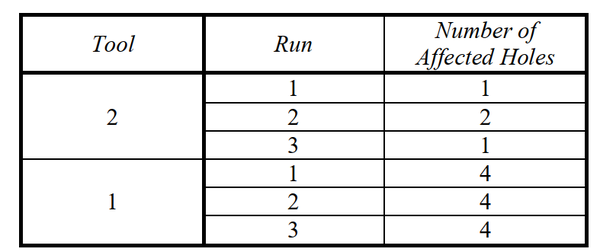
Similar to Table 4, Table 5 presents the hole exit (steel layer) during one run of experiments with both tools. The differences between the results are more accentuated than in the previous point. The higher difficulty to machine the steel layer by Tool 1 is very evident with the work piece reaching very high temperatures on the periphery of the hole that could lead to microstructural transformations. This was also verified some the holes machined with Tool 2, due to the use of aggressive parameters. Table 6 shows that on a total of 24 holes drilled for each kind of tool, half of them showed overheating problems for Tool 1 while only 4 were verified for Tool 2.
Table 5 – Hole entry during a run of experiments
Table 6 – Holes affected by overheating
3.6 Cutting forces
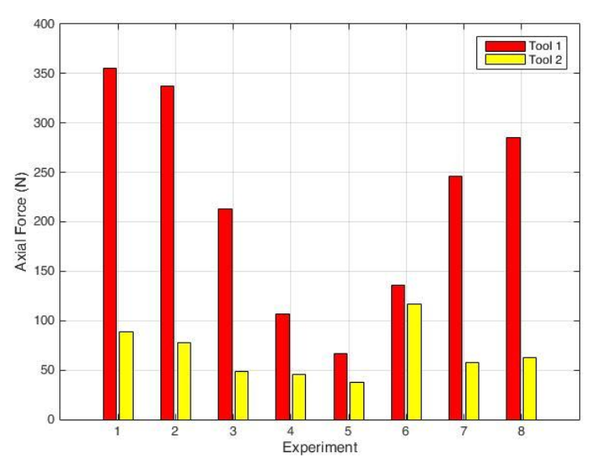
Due to problems that occurred during the measurement of the forces during runs 1 and 2 for Tool 1, it wasn’t possible to use the average values of all the runs. Therefore, to compare fairly the results between the tools, only the values of run 3 were used, shown in Figure 10. The figure indicates a very big difference between the forces obtained with each tool, with Tool 1 always having bigger values. This difference is verified since the first hole, with the values being about 2 times bigger on the first 2 experiments (5 and 4). The third experiment can be seen as an exception to what is verified since both values are of the same magnitude. After the fourth hole (experiment 3), with the highest parameters, Tool 1 becomes destroyed, leading to a much higher difficulty to machine through the steel layer and resulting on very elevated axial forces. It is interesting to see that Tool 2 presents a similar pattern, concerning the maximum axial forces, but without a big increase due to lower tool wear, as seen on point 3.1. It is important to mention that the present values are absolute values since during the several runs it was verified that on some occasions the axial force was negative, meaning that the load cell wasn’t being compressed but tensioned. It was possible to verify that this always happened on the steel layer but on the other hand it wasn’t possible to reach a conclusion to what could be the cause of such event. Similar phenomena was seen by Neto [16] during orbital drilling of titanium, on the same machine, and the author pointed that those behaviors could be related to the approaching of the tool to the exit surface of plate and even due to the passing through the exit surface of the tool. This issue was also briefly approached by Poutord et al. [17] during conventional drilling of titanium, pointing out that negative thrust forces could be verified on both the tip and margin of the tool.
3.7 ANOVA analysis
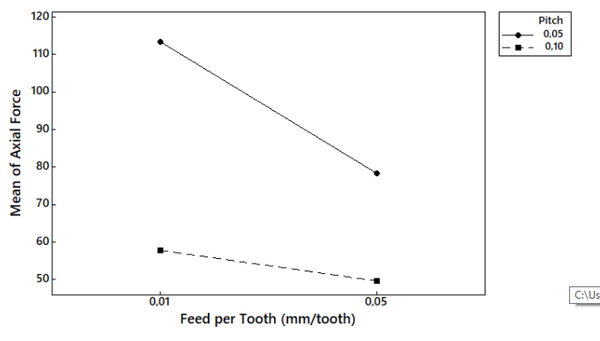
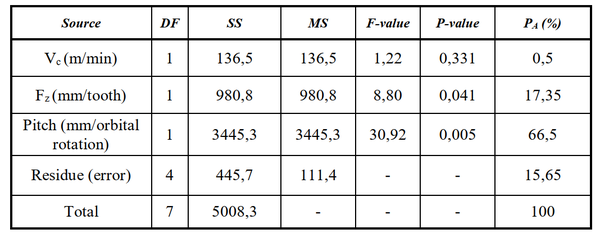
On the previous points it became evident that tool 2, recommend to machine steel, presents higher flexibility to machine this combination of materials. Therefore, an ANOVA analysis using Minitab was done to verify which cutting parameters present higher influence on axial force. Table 7 shows the ANOVA table where the sum of squares (SS) is equal to the mean of squares (MS) due to the fact of each factor having one degree of freedom (DF). A p-value of 0.05 was chosen, corresponding to a confidence interval of 95%. Values above this p-value are considered to be statistically irrelevant, which is the case for cutting speed (Vc) with a p-value equal to 0.331. Helical pitch is seen as the most influent parameter, whose increase, Figure 11, leads to a considerable decrease on cutting forces. It is an interesting result that contrasts with other researches done until now. Figure 11 also shows that an increase on feed rate leads to a decrease on axial forces, a conclusion that shows some accordance with what was studied by Denkena et al. [6] during machining of CFRP/Ti stacks. The PA values present the percentage contribution of each factor. Just as expected from the analysis of the p-values, helical pitch is the most influent parameter, with 66,5% of influence on the results and cutting speed having an insignificant influence of 0.5%. From analyzing the values of PA it’s possible to see that a considerable percentage (15,65%) isn’t explained by the variation of source parameters but rather due to noise and other uncontrollable factors. Although unknown, these factors have practically the same influence as feed per tooth (Fz), the later with a percentage contribution of 17.3%.
4 Conclusions[[#|]]
This paper presented an investigation on orbital drilling of CFRP/Steel hybrid composites. For that purpose a Design of Experiments (DoE) with two end mills, one recommend for each material, under dry conditions was carried out to study the diameter, axial force, delamination and overall quality of the work piece after the operation. The following conclusions were made:
1.The tool recommend to machine CFRP (tool 1) was proven to be very ineffective, with worse results on every aspect when compared with the tool recommend to machine steel, with the former being more flexible to machine this combination of materials
2.The higher cutting parameters used on this investigation were found to be very aggressive, leading to very high tool wear and temperatures that degraded the matrix and originated possible microstructural changes on the metal and should therefore be avoided.
3. Delamination was not a considerable issue. This result was somewhat expected, being one of the main advantages of orbital drilling and demonstrated by several researches
4. By means of ANOVA analysis, it was possible to conclude that helical pitch is most influent parameter, leading to a considerable decrease of the axial force. It was also show that cutting speed has insignificant influence and that an increase on feed rate can also lead to a decrease on axial force.
Acknowledgments
The authors acknowledge the support of PALBIT, s.a for providing the tools used and the support of Instituto de Ciência e Inovação em Engenharia Mecânica e Engenharia Industrial (INEGI), where the experiments were carried out.
Authors gratefully acknowledge the funding of Project NORTE-01-0145-FEDER-000022 - SciTech - Science and Technology for Competitive and Sustainable Industries, cofinanced by Programa Operacional Regional do Norte (NORTE2020), through Fundo Europeu de Desenvolvimento Regional (FEDER).”
References
[1] T. Sinmazçelik et al., A review: Fibre metal laminates, background, bonding types and applied test methods. Materials & Design, 2011. 32(7): pp. 3671-3685.
[2] R. B. D. Pereira et al., A review of helical milling process. International Journal of Machine Tools and Manufacture, 2017. 120: pp. 27-48.
[3] H. Wang, X. Qin, and H. Li, Machinability analysis on helical milling of carbon fiber reinforced polymer. Journal of Advanced Mechanical Design, Systems, and Manufacturing, 2015. 9(5): pp. 35-46.
[4] W. Haiyan et al., Analysis of cutting forces in helical milling of carbon fiber–reinforced plastics. Proceedings of the Institution of Mechanical Engineers, Part B: Journal of Engineering Manufacture, 2013. 227(1): pp. 62-74.
[5] H. Wang, H., et al., Optimization of Cutting Parameters in Helical Milling of Carbon Fiber Reinforced Polymer. Transactions of Tianjin University, 2018. 24(1): pp. 1-10.
[6] Denkena, B., D. Boehnke, and J. Dege, Helical milling of CFRP–titanium layer compounds. CIRP Journal of Manufacturing Science and Technology, 2008. 1(2): pp. 64-69.
[7] Zhou, L., et al., Hole diameter variation and roundness in dry orbital drilling of CFRP/Ti stacks. The International Journal of Advanced Manufacturing Technology, 2016. 87(1-4): pp. 811-824.
[8] H.Wang et al., A comparative study on helical milling of CFRP/Ti stacks and its individual layers. The International Journal of Advanced Manufacturing Technology, 2016. 86(5-8): pp. 1973-1983.
[9] Q. Liu et al., An experimental study on fatigue characteristics of CFRP-steel hybrid laminates. Materials & Design, 2015. 88: pp. 643-650.
[10] M. Dlugosch, et al. Experimental Investigation of Automotive Components Consisting of Hybrid FRP-Metal-Material Systems Under Dynamic Loading. In Euro Hybrid Materials and Structures. 2016. Kaiserslautern, Alemanha. pp. 63-68.
[11] T. Osiecki et al., Thermoplastic fiber reinforced/metal-hybrid laminates for structural lightweight applications. in Proc. 23rd Annual International Conference on Composites/Nano Engineering (ICCE-23). 2015.
[12] F. Yüksel, R. Hinterhölzl, and K. Drechsler, Experimental Investigation of Direct Adhesion of CFR-Thermoplast on Steel. In Euro Hybrid Materials and Structures 2016. Kaiserslautern, Alemanha. pp. 247-250.
[13] M. Gall et al., Delamination in UD-CFRP Steel Hybrid Laminates - Part 1: Method Implementation and Interface Variation. In Euro Hybrid Materials and Structures. 2016. Kaiserslautern, Alemanha. pp. 8-11.
[14] H. Hocheng, and C. Tsao, The path towards delamination-free drilling of composite materials. Journal of Materials Processing Technology, 2005. 167(2-3): pp. 251-264.
Document information
Accepted on 17/12/24
Submitted on 02/05/22
Licence: Other
Share this document
Keywords
claim authorship
Are you one of the authors of this document?
